To practice calligraphy with the round hand lettering nib, you will need the following materials:
Lined paper, a penholder, a 2 to 2.5mm round hand nib, ink (preferably not Indian ink) and a paper towel to clean the nib. A lined writing pad is very convenient for practicing, although the paper quality is usually not very good. If you want to use other papers, you should definitely draw lines with the pencil in the beginning to become familiar with the dimensions and proportions of the writing. The sheet should be straight in front of you when you write, otherwise it is visually difficult to judge whether a drawn line is really straight or italic. If children are around, secure the inkwell ...
 The Brause & Co Round Hand Lettering nib no. 180 has little flexibility and is well suited for the beginning. Round Hand Nibs with higher flexibility offer interesting options regarding the variation of the stroke width, but require more control. I would recommend to try them later.
The nib has to be placed firmly in the holder like shown in the picture. The nib should not be tottering. The top reservoir must not protrude from the foremost writing edge.
Dip the nib into the inkwell until the top reservoir is filled and then briefly dab the nib on the edge of the inkwell to remove excess ink. You can also use a small brush to put a drop of ink under the reservoir. This way you can mix colors and achieve smooth color transitions.
Place the pen on the paper at an angle of about 40 degrees to the horizontal and draw a vertical line between two lines.
If the angle is not correct, move your wrist or alter the distance of the elbow to the body to correct the angle. The angle of about 40 degrees is usually maintained, especially when practicing. As you can see on the picture above, the form of the letter changes when the angle changes.

When you got the angle right, try longer vertical and horizontal lines, arcs and semicircles. Be careful not to change the angle! Ideally the movement comes from the fingers. Only with very big letters the whole arm should be moved.
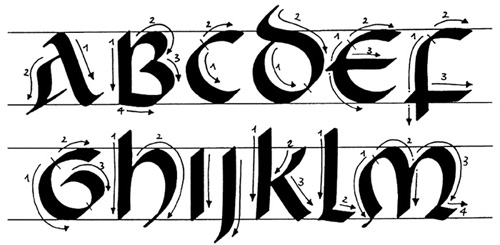
Once you are comfortable with the handling of the pen, the next step is to practice the individual letter forms. For starters, for example, the Uncial or the Carolingian Minuscule are relatively easy to write. It should be noted that the nib is usually only pulled. When the nib is pushed, the ink cannot flow. That's why you usually have to reposition the nib two or three times when write a letter. Below you will see some examples.
As a rule, start with the left part of the letter, followed by the upper and / or middle part, then the right and finally the bottom part. Once you have written a few letters, you will quickly get it. Always pay attention to the ascenders and descenders of the letters when practicing. When you practise writing texts without any layout, just word after word, it will train your feeling for the letter and word spacing.

▪ In the calligraphy shop you will find exercise books for different kinds of scripts.
Especially with new nibs this is often a problem. Usually the nib is not greasy, but the aqueous ink beads on the smooth metal surface. Rub the nib carefully but firmly with a paper towel, that usually helps a lot. Put the nib on the paper, give light pressure and jerk a little bit to make the ink flow.
Treating the nib with fire is not a good idea, it may easily destroy it. The heat causes the metal to lose its flexibility. It becomes soft and no longer springs back when pressure is applied. When the nib slit remains open just a tiny bit, the ink can no longer flow properly to the nib tip. Especially with older nibs, you can check whether the nib slit is still closed. Hold the nib against the light and see if it shines through the gap. Try vinegar to oxidize the metal surface. The problem soon subsides anyway as the metal surface oxidizes due to moisture and thus becomes rougher.
If the ink won't flow in certain spots of the paper, it may be because it has become greasy from your hands. Therefore, if you are creating a beautiful page, it is recommendable to place a protective sheet of paper under your hands when writing. Make sure that you do not wipe the protective sheet over the freshly written letters!
Probably the writing edge of the nib does not touch the paper on its full length. Try to change the position of the pen nib by rolling the pen holder between your fingers. Remember to maintain the angle of 40 degrees to the horizontal.
If you face any other problem that is worth being mentioned here, please contact me.